This is the Quick Guide. For more detail, see the full user manual at http://picocli.info.
1. What is picocli
Picocli is a Java library and mini-framework for creating command line applications with almost no code.
Picocli supports a variety of command line syntax styles including POSIX, GNU, MS-DOS and more. It generates highly customizable usage help messages with ANSI colors and styles. Picocli-based applications can have command line TAB completion showing available options, option parameters and subcommands, for any level of nested subcommands.

2. How to Use it
Create a class and annotate its fields or methods with @Option or @Parameters to declare what options and positional parameters your application expects.
While parsing the command line, picocli will initialize these fields based on the command line arguments.
If your class implements Runnable or Callable, you can let picocli kick off your application after parsing is successfully completed.
| For applications that cannot use the annotations, there is also a programmatic API for defining what options and positional parameters to expect, and a programmatic API for handling parse results. The programmatic API is not covered in this Quick Guide. |
2.1. Example
Here is a small example application that uses the CommandLine.call convenience method
to do parsing and error handling in one line of code. The mixinStandardHelpOptions attribute
adds usage help and version help options your application.
Callable application@Command(description = "Prints the checksum (MD5 by default) of a file to STDOUT.",
name = "checksum", mixinStandardHelpOptions = true, version = "checksum 3.0")
class CheckSum implements Callable<Void> {
@Parameters(index = "0", description = "The file whose checksum to calculate.")
private File file;
@Option(names = {"-a", "--algorithm"}, description = "MD5, SHA-1, SHA-256, ...")
private String algorithm = "SHA-1";
public static void main(String[] args) throws Exception {
CommandLine.call(new CheckSum(), args);
}
@Override
public Void call() throws Exception {
byte[] fileContents = Files.readAllBytes(file.toPath());
byte[] digest = MessageDigest.getInstance(algorithm).digest(fileContents);
System.out.println(javax.xml.bind.DatatypeConverter.printHexBinary(digest));
return null;
}
}3. Options and Parameters
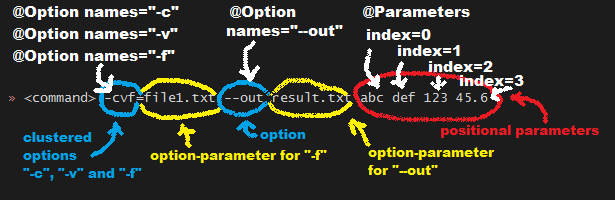
Command line arguments can be separated into options and positional parameters. Options have a name, positional parameters are usually the values that follow the options, but they may be mixed.
Picocli has separate annotations for options and positional parameters.
3.1. Options
An option must have one or more names.
Option names commonly start with - or --, but picocli lets you use any option name you want.
The below example shows options with one or more names, options that take an option parameter, and a help option.
class Tar {
    @Option(names = "-c", description = "create a new archive")
    boolean create;

    @Option(names = { "-f", "--file" }, paramLabel = "ARCHIVE", description = "the archive file")
    File archive;

    @Parameters(paramLabel = "FILE", description = "one or more files to archive")
    File[] files;

    @Option(names = { "-h", "--help" }, usageHelp = true, description = "display a help message")
    private boolean helpRequested;
}
Picocli matches the option names to set the field values.
String[] args = { "-c", "--file", "result.tar", "file1.txt", "file2.txt" };
Tar tar = new Tar();
new CommandLine(tar).parse(args);

assert !tar.helpRequested;
assert  tar.create;
assert  tar.archive.equals(new File("result.tar"));
assert  Arrays.equals(tar.files, new File[] {new File("file1.txt"), new File("file2.txt")});
Picocli supports POSIX clustered short options: one or more single-character options without option-arguments, followed by at most one option with an option-argument, can be grouped behind one ‘-’ dash.
For example, for the Tar example above, the following command line invocations are equivalent:
tar -c -f result.tar f1.txt f2.txt
tar -cf result.tar f1.txt f2.txt
tar -cfresult.tar f1.txt f2.txt
3.2. Interactive (Password) Options
For options and positional parameters marked as interactive, the user is prompted to enter a value on the console.
When running on Java 6 or higher, picocli will use the Console.readPassword API so that user input is not echoed to the console.
The user manual has an example.
3.3. Positional Parameters
Any command line arguments that are not subcommands, options or option parameters are interpreted as positional parameters.
Use the (zero-based) index attribute to specify exactly which parameters to capture.
Omitting the index attribute means the field captures all positional parameters.
Array or collection fields can capture multiple values.
The index attribute accepts range values, so an annotation like @Parameters(index = "2..4") captures the arguments at index 2, 3 and 4. Range values can be open-ended. For example, @Parameters(index = "3..*") captures all arguments from index 3 and up.
For example:
class PositionalDemo {
    @Parameters(index = "0")    InetAddress host;
    @Parameters(index = "1")    int port;
    @Parameters(index = "2..*") List<File> files;
}
Picocli initializes fields with the values at the specified index in the arguments array.
String[] args = { "localhost", "12345", "file1.txt", "file2.txt" };
PositionalDemo params = CommandLine.populateCommand(new PositionalDemo(), args);

assert params.host.getHostName().equals("localhost");
assert params.port == 12345;
assert params.files.equals(Arrays.asList(new File("file1.txt"), new File("file2.txt")));
The user manual has more details about options and positional parameters, as well as the -- end-of-options delimiter and parameter files (@-files).
4. Strongly Typed Everything
When command line options and positional parameters are mapped to the annotated fields, the text value is converted to the type of the annotated field.
4.1. Type Conversion
Out of the box, picocli can convert command line argument strings to a number of common data types.
See the user manual for the full list of built-in types, but in general all primitive types and their Object equivalent,
any enum, and common classes like File, Date, URL, BigDecimal, regex Pattern etc. can be used as is.
Applications running on Java 7 can use Path, and on Java 8 the new java.time classes can be used.
You can also use a custom type converter to handle data types other than the above built-in ones.
4.2. Collections and Maps
If an option or positional parameter can have multiple values, the field type must be an array, a Collection or a Map.
Any Collection subclass like List, Set, or Queue can be used.
A common requirement is to have options with key-value pairs similar to Java’s system properties, like -Dkey=value.
To achieve this, all you need to do is use a Map field.
Map fields may have any type for their key and value
as long as a type converter is registered for both the key and the value type.
Key and value types are inferred from the map’s generic type parameters.
For example:
class MapDemo {
    @Option(names = {"-u", "--timeUnit"});
    Map<java.util.concurrent.TimeUnit, Long> timeout;
}
The following command line would result in four key-value entries in the map:
<command> -uDAYS=3 -u HOURS=23 -u=MINUTES=59 --timeUnit=SECONDS=135. Required Arguments
5.1. Required Options
Options can be marked required to make it mandatory for the user to specify them on the command line. When a required option is not specified, a MissingParameterException is thrown from the parse method. For example:
@Option(names = "-n", required = true, description = "mandatory number")
int number;
5.2. Required Parameters
Use the arity attribute to make @Parameters mandatory:
@Parameters(arity = "1..*", descriptions = "at least one File")
List<File> files;
6. Multiple Values
Multi-valued options and positional parameters are annotated fields that can capture multiple values from the command line.
6.1. Repeated Options
The simplest way to create a multi-valued option is to declare an annotated field whose type is an array, collection or a map.
@Option(names = "-option")
int[] values;
Users may specify the same option multiple times. For example:
<command> -option 111 -option 222 -option 333
Each value is appended to the array or collection.
6.2. Split Regex
Options and parameters may also specify a split regular expression used to split each option parameter into smaller substrings.
Each of these substrings is converted to the type of the collection or array. See Collections and Maps.
@Option(names = "-option", split = ",")
int[] values;
A single command line argument like the following will be split up and three int values are added to the array:
-option 111,222,333
6.3. Arity
Sometimes you want to define an option that requires more than one option parameter for each option occurrence on the command line.
The arity attribute lets you control exactly how many parameters to consume for each option occurrence.
The arity attribute can specify an exact number of required parameters, or a range with a minimum and a maximum number of parameters.
The maximum can be an exact upper bound, or it can be "*" to denote any number of parameters. For example:
class ArityDemo {
    @Parameters(arity = "1..3", descriptions = "one to three Files")
    File[] files;

    @Option(names = "-f", arity = "2", description = "exactly two floating point numbers")
    double[] doubles;

    @Option(names = "-s", arity = "1..*", description = "at least one string")
    String[] strings;
}
A MissingParameterException is thrown when fewer than the miminum number of parameters is specified on the command line.
6.3.1. Default Arity
If no arity is specified, the number of parameters depends on the field’s type.
The user manual has more details on arity.
7. Help Options
7.1. Mixin Standard Help Options
When the mixinStandardHelpOptions command attribute is set to true, picocli adds a mixin to the
command that adds usageHelp and versionHelp options to the command. For example:
@Command(mixinStandardHelpOptions = true, version = "auto help demo - picocli 3.0")
class AutoHelpDemo implements Runnable {

    @Option(names = "--option", description = "Some option.")
    String option;

    @Override public void run() { ... }
}
The usage help message for the above example looks like this:
Usage: <main class> [-hV] [--option=<option>]
      --option=<option>   Some option.
  -h, --help              Show this help message and exit.
  -V, --version           Print version information and exit.
7.2. Custom Help Options
Applications can define custom help options by setting attribute versionHelp = true, usageHelp = true or help = true.
If one of the arguments specified on the command line is a "help" option, picocli will not throw a MissingParameterException when required options are missing.
For example:
@Option(names = {"-V", "--version"}, versionHelp = true, description = "display version info")
boolean versionInfoRequested;

@Option(names = {"?", "-h", "--help"}, usageHelp = true, description = "display this help message")
boolean usageHelpRequested;
Use these attributes for options that request the usage help message or version information to be shown on the console.
The CommandLine class offers two methods that allow external components to detect whether
usage help or version information was requested (without inspecting the annotated domain object):
-
CommandLine.isUsageHelpRequested()returnstrueif the parser matched an option annotated withusageHelp=true -
CommandLine.isVersionHelpRequested()returnstrueif the parser matched an option annotated withversionHelp=true
CommandLine commandLine = new CommandLine(new App());
commandLine.parse(args);
if (commandLine.isUsageHelpRequested()) {
   commandLine.usage(System.out);
   return;
} else if (commandLine.isVersionHelpRequested()) {
   commandLine.printVersionHelp(System.out);
   return;
}
// ... run App's business logic
See also Parsing and Runnable and Callable for how picocli can help reduce boilerplate code.
8. Version Help
8.1. Static Version Information
Applications can specify version information in the version attribute of the @Command annotation.
@Command(version = "1.0")
class VersionedCommand { ... }
The CommandLine.printVersionHelp(PrintStream) method extracts the version information from this
annotation and prints it to the specified PrintStream.
CommandLine commandLine = new CommandLine(new VersionedCommand());
//...
commandLine.printVersionHelp(System.out);
The version may specify multiple Strings, and may contain markup to show ANSI styles and colors. For example:
@Command(version = {
        "@|yellow Versioned Command 1.0|@",
        "@|blue Build 12345|@",
        "@|red,bg(white) (c) 2017|@" })
class VersionedCommand { ... }
The markup will be rendered as ANSI escape codes on supported systems.

8.2. Dynamic Version Information
The @Command annotation supports a versionProvider attribute.
Applications may specify a IVersionProvider implementation in this attribute, and picocli will instantiate this class
and invoke it to collect version information.
9. Usage Help
9.1. Example Usage Message
Picocli makes it easy for your application to generate a usage help message like this:
Usage: cat [-AbeEnstTuv] [--help] [--version] [FILE...]
Concatenate FILE(s), or standard input, to standard output.
      FILE                 Files whose contents to display
  -A, --show-all           equivalent to -vET
  -b, --number-nonblank    number nonempty output lines, overrides -n
  -e                       equivalent to -vET
  -E, --show-ends          display $ at end of each line
  -n, --number             number all output lines
  -s, --squeeze-blank      suppress repeated empty output lines
  -t                       equivalent to -vT
  -T, --show-tabs          display TAB characters as ^I
  -u                       (ignored)
  -v, --show-nonprinting   use ^ and M- notation, except for LDF and TAB
      --help               display this help and exit
      --version            output version information and exit
Copyright(c) 2017
The usage help message is generated from annotation attributes, like below:
@Command(name = "cat", footer = "Copyright(c) 2017",
         description = "Concatenate FILE(s), or standard input, to standard output.")
class Cat {

  @Parameters(paramLabel = "FILE", description = "Files whose contents to display")
  List<File> files;

  @Option(names = "--help", usageHelp = true, description = "display this help and exit")
  boolean help;

  @Option(names = "-t",                 description = "equivalent to -vT")  boolean t;
  @Option(names = "-e",                 description = "equivalent to -vET") boolean e;
  @Option(names = {"-A", "--show-all"}, description = "equivalent to -vET") boolean all;

  // ...
}
9.2. Usage Help Message Elements
The various elements of the usage help message are easily customized with annotations.
9.2.1. Command Name
In the above example, the program name is taken from the name attribute of the Command annotation:
@Command(name = "cat")Without a name attribute, picocli will show a generic <main class> in the synopsis:
Usage: <main class> [-AbeEnstTuv] [--help] [--version] [FILE...]
9.2.2. Parameter Labels
Non-boolean options require a value. The usage help should explain this, and picocli shows the option parameter
in the synopsis and in the option list. By default, the field name is shown in < and > fish brackets.
Use the paramLabel attribute to display a different name. For example:
Usage: <main class> [-f=FILE] [-n=<number>] NUM <host>
      NUM        number param
      host       the host
  -f= FILE       a file
  -n= <number>   number option
Some annotated fields in the below example class have a paramLabel attribute and others don’t:
@Command()
class ParamLabels {
    @Option(names = "-f",    description = "a file",       paramLabel = "FILE") File f;
    @Option(names = "-n",    description = "number option")                     int number;
    @Parameters(index = "0", description = "number param", paramLabel = "NUM")  int n;
    @Parameters(index = "1", description = "the host")                          InetAddress host;
}
9.2.3. Unsorted Option List
By default the options list displays options in alphabetical order. Use the sortOptions = false attribute to display options in the order they are declared in your class.
@Command(sortOptions = false)9.2.4. Abbreviated Synopsis
If a command is very complex and has many options, it is sometimes desirable to suppress details from the synopsis with the abbreviateSynopsis attribute. For example:
@Command(abbreviateSynopsis = true)
class App { ... }
This shows the below synopsis. Positional parameters are not abbreviated.
Usage: <main class> [OPTIONS] [<files>...]
9.2.5. Custom Synopsis
For even more control of the synopsis, use the customSynopsis attribute to specify one or more synopsis lines. For example:
Usage: ln [OPTION]... [-T] TARGET LINK_NAME   (1st form)
  or:  ln [OPTION]... TARGET                  (2nd form)
  or:  ln [OPTION]... TARGET... DIRECTORY     (3rd form)
  or:  ln [OPTION]... -t DIRECTORY TARGET...  (4th form)
To produce a synopsis like the above, specify the literal text in the customSynopsis attribute:
@Command(synopsisHeading = "", customSynopsis = {
        "Usage: ln [OPTION]... [-T] TARGET LINK_NAME   (1st form)",
        "  or:  ln [OPTION]... TARGET                  (2nd form)",
        "  or:  ln [OPTION]... TARGET... DIRECTORY     (3rd form)",
        "  or:  ln [OPTION]... -t DIRECTORY TARGET...  (4th form)",
})
class Ln { ... }
9.2.6. Header and Footer
The header will be shown at the top of the usage help message (before the synopsis). The first header line is also the line shown in the subcommand list if your command has subcommands (see Usage Help for Subcommands).
Use the footer attribute to specify one or more lines to show below the generated usage help message.
Each element of the attribute String array is displayed on a separate line.
The headerHeading and footerHeading may contain format specifiers. See Section Headings.
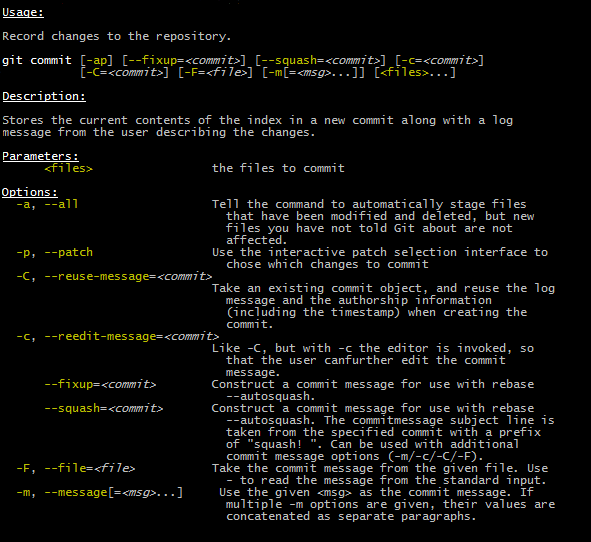
9.2.7. Section Headings
Section headers can be used to make usage message layout appear more spacious. Section headings may contain embedded line separator (%n) format specifiers:
@Command(name = "commit",
        sortOptions = false,
        headerHeading = "Usage:%n%n",
        synopsisHeading = "%n",
        descriptionHeading = "%nDescription:%n%n",
        parameterListHeading = "%nParameters:%n",
        optionListHeading = "%nOptions:%n",
        header = "Record changes to the repository.",
        description = "Stores the current contents of the index in a new commit " +
                "along with a log message from the user describing the changes.")
class GitCommit { ... }
The usage help message generated from this class is shown below in Expanded Example in the user manual.
9.2.8. Option-Parameter Separators
The separator displayed between options and option parameters (= by default)
in the synopsis and the option list can be configured with the separator attribute.
@Command(separator = ":")9.2.9. Hidden Options and Parameters
Options and Parameters with the hidden attribute set to true will not be shown in the usage help message.
See the user manual for details.
9.2.10. Show Default Values
The default value for an option or positional parameter
can be embedded in the description by specifying the variable ${DEFAULT-VALUE} in the description text.
See the user manual for details.
Similarly, it is possible to embed the completion candidates in the description for an option or positional parameter by
specifying the variable ${COMPLETION-CANDIDATES} in the description text.
See the user manual for details.
9.2.11. Required-Option Marker
Required options can be marked in the option list by the character specified with the requiredOptionMarker attribute.
See the user manual for details.
9.2.12. Usage Width
The default width of the usage help message is 80 characters.
System property picocli.usage.width can be used to specify a custom width.
The minimum width that can be configured is 55 characters.
The width can also be set programmatically via the CommandLine::setUsageHelpWidth and UsageMessageSpec::width methods.
10. ANSI Colors and Styles
10.1. Colorized Example
Below shows the same usage help message as shown in the Expanded Example in the user manual, with ANSI escape codes enabled.
10.2. Usage Help with Styles and Colors
You can use colors and styles in the descriptions, header and footer of the usage help message.
Picocli supports a custom markup notation for mixing colors and styles in text,
following a convention introduced by Jansi, where
@| starts a styled section, and |@ ends it.
Immediately following the @| is a comma-separated list of colors and styles, so @|STYLE1[,STYLE2]… text|@.
For example:
@Command(description = "Custom @|bold,underline styles|@ and @|fg(red) colors|@.")
| Pre-defined Styles | Pre-defined Colors |
|---|---|
bold |
black |
faint |
red |
underline |
green |
italic |
yellow |
blink |
blue |
reverse |
magenta |
reset |
cyan |
white |
Colors are applied as foreground colors by default.
You can set background colors by specifying bg(<color>).
For example, @|bg(red) text with red background|@.
Similarly, fg(<color>) explicitly sets the foreground color.
The example below shows how this markup can be used to add colors and styles to the headings and descriptions of a usage help message:
@Command(name = "commit",
        sortOptions = false,
        headerHeading = "@|bold,underline Usage|@:%n%n",
        synopsisHeading = "%n",
        descriptionHeading = "%n@|bold,underline Description|@:%n%n",
        parameterListHeading = "%n@|bold,underline Parameters|@:%n",
        optionListHeading = "%n@|bold,underline Options|@:%n",
        header = "Record changes to the repository.",
        description = "Stores the current contents of the index in a new commit " +
                "along with a log message from the user describing the changes.")
class GitCommit { ... }
Markup styles cannot be nested, for example: @|bold this @|underline that|@|@ will not work. You can achieve the same by combining styles, for example: @|bold this|@ @|bold,underline that|@ will work fine.
|
10.2.1. More Colors
There are only eight pre-defined named colors, but most terminals support a 256 color indexed palette.
See the More Colors section of the user manual for using these colors as foreground or background colors.

10.2.2. Color Scheme for Fixed Elements
Picocli uses a default color scheme for options, parameters and commands. There are no annotations to modify this color scheme, but it can be changed programmatically and with system properties. For details, see the Color Scheme section of the user manual.
10.3. Supported Platforms
Picocli will only emit ANSI escape codes on supported platforms. This includes most Unix and Linux platforms. See the Windows section of the user manual for the various options available to add coloring support to the Windows command console.
10.4. Forcing ANSI On/Off
You can force picocli to either always use ANSI codes or never use ANSI codes regardless of the platform:
-
Setting system property
picocli.ansitotrueforces picocli to use ANSI codes; settingpicocli.ansitofalseforces picocli to not use ANSI codes. This may be a useful facility for users of your command line application. -
You can decide to force disable or force enable ANSI escape codes programmatically by specifying
Ansi.ONorAnsi.OFFwhen invokingCommandLine.usage. This overrides the value of system propertypicocli.ansi. For example:
import picocli.CommandLine.Help.Ansi;

App app = CommandLine.usage(new App(), System.out, Ansi.OFF, args);
11. Subcommands
11.1. Registering Subcommands
Subcommands can be registered programmatically or declaratively
11.1.1. Programmatically
Subcommands can be registered with the CommandLine.addSubcommand method.
You pass in the name of the command and the annotated object to populate with the subcommand options.
The specified name is used by the parser to recognize subcommands in the command line arguments.
CommandLine commandLine = new CommandLine(new Git())
        .addSubcommand("status",   new GitStatus())
        .addSubcommand("commit",   new GitCommit())
        .addSubcommand("add",      new GitAdd())
        .addSubcommand("branch",   new GitBranch())
        .addSubcommand("checkout", new GitCheckout())
        .addSubcommand("clone",    new GitClone())
        .addSubcommand("diff",     new GitDiff())
        .addSubcommand("merge",    new GitMerge())
        .addSubcommand("push",     new GitPush())
        .addSubcommand("rebase",   new GitRebase())
.addSubcommand("tag", new GitTag());| Note on custom type converters: custom type converters are registered only with the subcommands and nested sub-subcommands that were added before the custom type was registered. To ensure a custom type converter is available to all subcommands, register the type converter last, after adding subcommands. |
11.1.2. Declaratively
Subcommands can be registered declaratively with the @Command annotation’s subcommands attribute.
@Command(name = "git", subcommands = {
    GitStatus.class,
    GitCommit.class,
    GitAdd.class,
    GitBranch.class,
    GitCheckout.class,
    GitClone.class,
    GitDiff.class,
    GitMerge.class,
    GitPush.class,
    GitRebase.class,
    GitTag.class
})
public class Git { ... }
The declared subcommands are automatically instantiated and added when the new CommandLine(new Git()) instance is constructed.
Subcommands referenced in a subcommands attribute must have a @Command annotation with a name attribute, or an exception is thrown from the CommandLine constructor.
11.1.3. Nesting Subcommands
Subcommands can be nested to any arbitrary level of depth. See the Nested sub-Subcommands section of the user manual for details.
11.2. Parsing Subcommands
For this example, we assume we created an alias git that invokes our Java application. This could also be a script or a function that calls our Java program:
alias git='java picocli.Demo$Git'Next, we call our command with some arguments like this:
git --git-dir=/home/rpopma/picocli status -sb -unoWhere git (actually java picocli.Demo$Git) is the top-level command, followed by a global option and a subcommand status with its own options.
Setting up the parser and parsing the command line could look like this:
public static void main(String... args) {
    // Set up the parser
    CommandLine commandLine = new CommandLine(new Git());

    // add subcommands programmatically (not necessary if the parent command
    // declaratively registers the subcommands via annotation)
    commandLine.addSubcommand("status",   new GitStatus())
               .addSubcommand("commit",   new GitCommit())
                ...

    // Invoke the parse method to parse the arguments
    List<CommandLine> parsed = commandLine.parse(args);
    handleParseResult(parsed);
}
The CommandLine.parse method returns a List with the recognized commands. The top-level command (the Java class invoked by git in this example) is always the first element in the returned list.
The returned List also contains all matched subcommands. Your application needs to inspect this list to see what subcommand was invoked and take appropriate action. For example:
private void handleParseResult(List<CommandLine> parsed) {
    assert parsed.size() == 2 : "1 command and 1 subcommand found"

    assert parsed.get(0).getCommand().getClass() == Git.class       : "main command"
    assert parsed.get(1).getCommand().getClass() == GitStatus.class : "subcommand"

    Git git = (Git) parsed.get(0).getCommand();
    assert git.gitDir.equals(new File("/home/rpopma/picocli"));

    GitStatus gitstatus = (GitStatus) parsed.get(1).getCommand();
    assert  gitstatus.shortFormat              : "git status -s"
    assert  gitstatus.branchInfo               : "git status -b"
    assert !gitstatus.showIgnored              : "git status --showIgnored not specified"
    assert  gitstatus.mode == GitStatusMode.no : "git status -u=no"
}
You may be interested in the convenience methods for subcommands to reduce error handling and other boilerplate code in your application.
11.3. @ParentCommand Annotation
In command line applications with subcommands, options of the top level command are often intended as "global" options that apply to all the subcommands.
The @ParentCommand annotation makes it easy for subcommands to access their parent command options: subcommand fields annotated with @ParentCommand are initialized with a reference to the parent command.
The user manual has an example showing how to use the @ParentCommand annotation.
11.4. Usage Help for Subcommands
After registering subcommands, calling the commandLine.usage method will show a usage help message that includes all subcommands in the order they were registered. For example:
Usage: git [-hV] [--git-dir=<gitDir>]
Git is a fast, scalable, distributed revision control system with an unusually
rich command set that provides both high-level operations and full access to
internals.
      --git-dir=<gitDir>   Set the path to the repository.
  -h, --help               Show this help message and exit.
  -V, --version            Print version information and exit.

Commands:

The most commonly used git commands are:
  help      Displays help information about the specified command
  status    Show the working tree status.
  commit    Record changes to the repository.
  add       Add file contents to the index.
  branch    List, create, or delete branches.
  checkout  Checkout a branch or paths to the working tree.
  clone     Clone a repository into a new directory.
  diff      Show changes between commits, commit and working tree, etc.
  merge     Join two or more development histories together.
  push      Update remote refs along with associated objects.
  rebase    Forward-port local commits to the updated upstream head.
  tag       Create, list, delete or verify a tag object signed with GPG.
The description for the subcommand in the list is taken from the subcommand’s first header line, or, if the subcommand does not have a header annotation, from the description.
11.4.1. Hidden Subcommands
Commands with the hidden attribute set to true will not be shown in the usage help message of their parent command.
See the Hidden Subcommands section of the user manual for details.
11.4.2. Help Subcommands
Picocli has a built-in Help subcommand,
but see the Help Subcommands section of the user manual if you’re interested in creating a custom help command.
12. Reuse
You may find yourself defining the same options, parameters or command attributes in many command line applications. To reduce duplication, picocli supports both subclassing and mixins as ways to reuse such options and attributes.
One way to reuse the above option and attributes is to extend the class. Picocli will walk the class hierarchy to check for annotations, so @Options, @Parameters and @Command attributes declared on a superclass are available in all subclasses.
A command can also include a mixin by annotating a field with @Mixin. All picocli annotations found in the mixin class
are added to the command that has a field annotated with @Mixin. For example:
@Command(name = "zip", description = "Example reuse with @Mixin annotation.")
public class MyCommand {

    // adds the options defined in ReusableOptions to this command
    @Mixin
    private ReusableOptions myMixin;
    ...
}
The Reuse section of the user manual has more extensive examples.
13. Parsing
When parsing the command line, an application needs to take care of the following:
-
If usage help was requested - show help message and exit
-
If version help was requested - show version information and exit
-
If the user input was invalid - show an error describing the problem and show the usage help
-
Execute the business logic
In Java code, that roughly looks like the below:
| In the next section we will show how to do the same in a single line of code, so keep reading… |
Callable<Object> callable = new MyCallable();
CommandLine cmd = new CommandLine(callable);
try {
    cmd.parse(args);
    if (cmd.isUsageHelpRequested()) {
        cmd.usage(System.out);
        return null;
    } else if (cmd.isVersionHelpRequested()) {
        cmd.printVersionHelp(System.out);
        return null;
    }
    return callable.call();
} catch (ParameterException ex) {
    System.err.println(ex.getMessage());
    if (!UnmatchedArgumentException.printSuggestions(ex, System.err)) {
        ex.getCommandLine().usage(System.err);
    }
    return null;
} catch (Exception ex) {
    throw new ExecutionException(cmd, "Error while calling " + callable, ex);
}
13.1. Runnable and Callable
You can omit some of the boilerplate code from your application when the annotated object implements Runnable or Callable:
Object result = CommandLine.call(new MyCallable(), args);The CommandLine.call method returns the result of the Callable, or null if the command line options were invalid. An error message and a usage help message are printed when the command line options were invalid. Exceptions thrown from the Callable.call method are caught, wrapped in an ExecutionException and rethrown.
When the annotated object implements Runnable, use the run method. For example:
CommandLine.run(new MyRunnable(), args);13.2. Convenience Methods for Subcommands
If the command class has subcommands, the CommandLine::call and CommandLine::run convenience methods will execute the most specific subcommand on the command line. For example:
<command> -g global_option subcommand -x -y -z subsubcommand param1 param2
In the above example, the subsubcommand is the most specific subcommand, and only the Runnable or Callable associated with that subcommand will be executed by the CommandLine::call and CommandLine::run convenience methods.
The CommandLine::parseWithHandler and CommandLine::parseWithHandlers convenience methods are intended to offer the same ease of use as the run and call methods, but with more flexibility and better support for nested subcommands.
For example:
CommandLine cmd = new CommandLine(MyTopLevelCommand())
        .addSubcommand("status",   new GitStatus())
        .addSubcommand("commit",   new GitCommit())
        .addSubcommand("add",      new GitAdd());
List<Object> result = cmd.parseWithHandler(new RunAll(), args);
The CommandLine::parseWithHandler method will take care of the following:
-
parse the specified command line arguments
-
if the input was invalid, delegate to
DefaultExceptionHandler, which will print the error message followed by the usage help message -
otherwise, if the command line arguments were parsed successfully, let the specified
IParseResultHandler2handle the parse result
Picocli provides some default IParseResultHandler2 implementations for common tasks:
-
the
RunLasthandler prints help if requested, and otherwise gets the last specified command or subcommand and tries to execute it as aRunnableorCallable -
the
RunFirsthandler prints help if requested, and otherwise executes the top-level command as aRunnableorCallable -
the
RunAllhandler prints help if requested, and otherwise executes all commands and subcommands that the user specified on the command line asRunnableorCallabletasks
13.3. Parser Configuration
The picocli parser can be configured to be more strict or lenient. You can instruct the parser to allow unknown options and other unmatched arguments, disallow POSIX clustered short options, and stop looking for options once a positional parameter or unmatched argument is found. See the Parser Configuration section of the user manual for details.
14. Tracing
Picocli supports parser tracing to facilitate troubleshooting.
System property picocli.trace controls the trace level. Supported levels are OFF, WARN, INFO, and DEBUG. The default trace level is WARN.
Specifying system property -Dpicocli.trace without a value will set the trace level to INFO.
-
DEBUG: Shows details of the decisions made by the parser during command line parsing.
-
INFO: Shows a high-level overview of what happens during command line parsing.
-
WARN: The default. Shows warnings instead of errors when lenient parsing is enabled: when single-value options were specified multiple times (and
CommandLine.overwrittenOptionsAllowedistrue), or when command line arguments could not be matched as an option or positional parameter (andCommandLine.unmatchedArgumentsAllowedistrue). -
OFF: Suppresses all tracing including warnings.
Example:
# create a custom 'mygit' command that invokes picocli.Demo$Git with tracing switched on
alias mygit='java -Dpicocli.trace -cp picocli-all.jar picocli.Demo$Git'

# invoke our command with some parameters
mygit --git-dir=/home/rpopma/picocli commit -m "Fixed typos" -- src1.java src2.java src3.java
Output:
[picocli INFO] Parsing 8 command line args [--git-dir=/home/rpopma/picocli, commit, -m, "Fixed typos", --, src1.java, src2.java, src3.java]
[picocli INFO] Setting File field 'Git.gitDir' to '\home\rpopma\picocli' for option --git-dir
[picocli INFO] Adding [Fixed typos] to List<String> field 'GitCommit.message' for option -m
[picocli INFO] Found end-of-options delimiter '--'. Treating remainder as positional parameters.
[picocli INFO] Adding [src1.java] to List<String> field 'GitCommit.files' for args[0..*]
[picocli INFO] Adding [src2.java] to List<String> field 'GitCommit.files' for args[0..*]
[picocli INFO] Adding [src3.java] to List<String> field 'GitCommit.files' for args[0..*]
15. TAB Autocomplete
Picocli-based applications can now have command line completion in Bash or Zsh Unix shells. See the Autocomplete for Java Command Line Applications manual for how to generate an autocompletion script tailored to your application.
16. More
To keep this Quick Guide short (or at least, short-ish) some things had to be left out. Here are some quick links in case you are interested:
-
Usage Help API for customizing the usage help message layout
Don’t forget to star the project on GitHub if you like it! Your stars keep me going! :-)